I was playing around with some clay when it hit me to make a watermelon themed post! Here are 5 watermelon inspired DIYs! I've been working on these for the past few weeks so I hope you like it! Click on read more to find the instructions!
DIY Watermelom Squishy/ Stressball
To make the Watermelon Squishy you need-
-memory foam ( I got mine at my local craft store)
-paint
-scissors
First decide on the shape you want your squishy to be. I did one half circle and one triangle. Cut out the basic shapes out of you foam. Next using your scissors snip off tiny prices of foam to round out the edges. The smaller pieces you chop the neater the finished product will look. Once with have your desired shape begin to paint. Remember to paint very thin coats. I only used one. Make sure the paint doesn't soak in or else it will loose it's squishy. I painted on the pink, then the green, then did a white stripe for the watermelon core! These were so fun to make and would be a great summer gift!
DIY Watermelon Quartz necklace
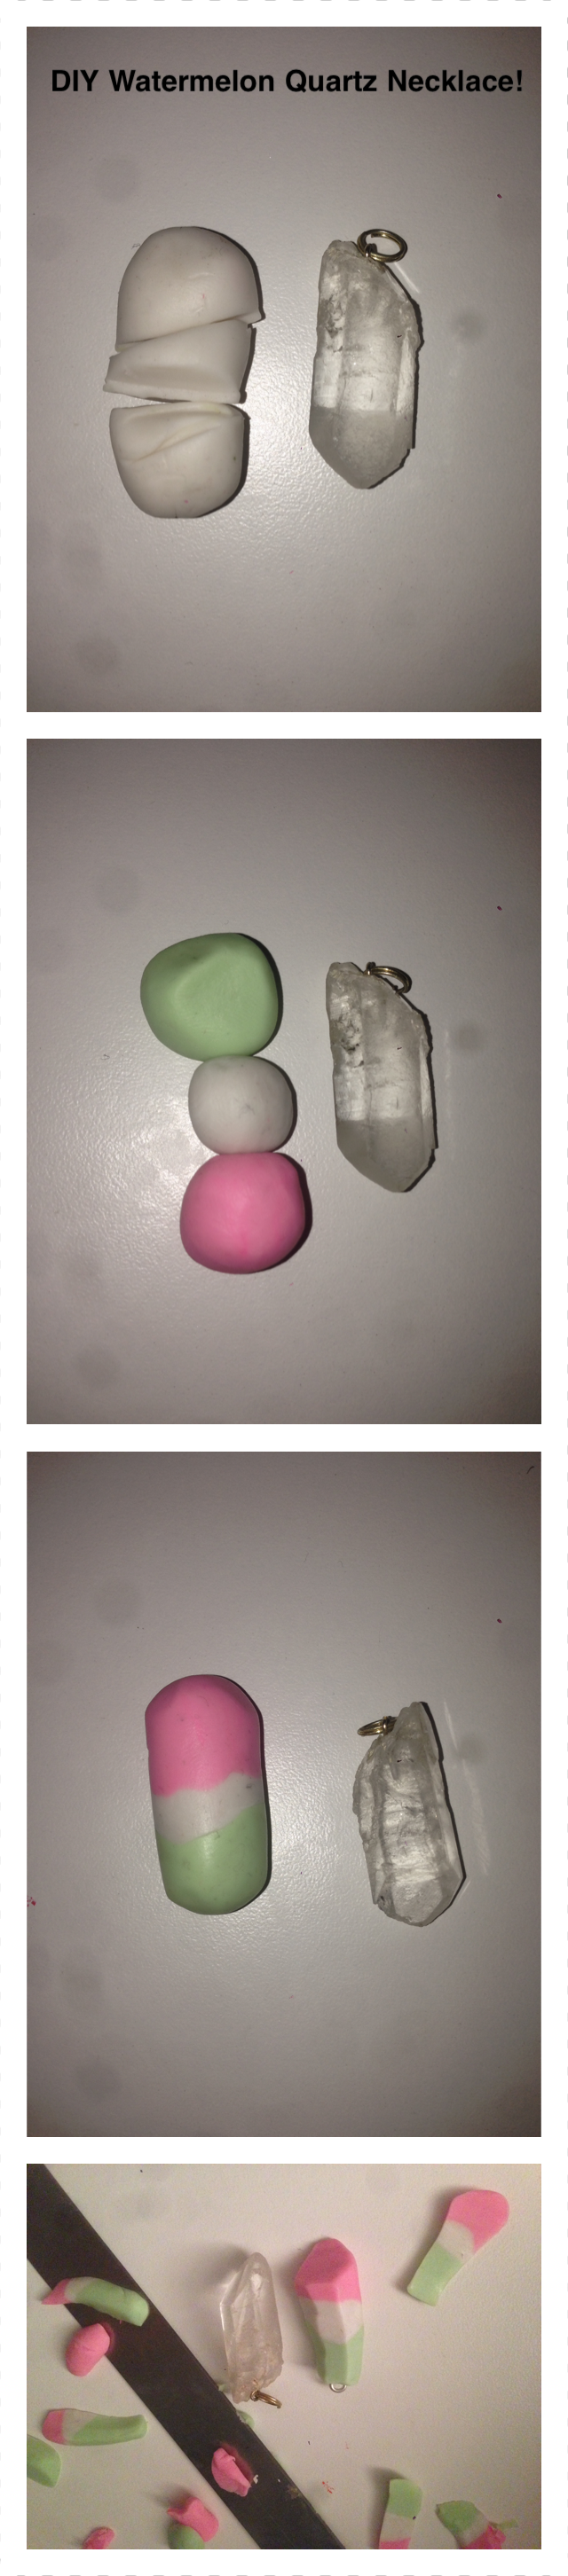
To better explain this DIY I took a series of pictures to demonstrate how I did this project better than I would have in words. I will just clearify some things in the photo. I used translucent polymer clay dyed with a tad bit of colored polymer clay. If you want yours more see through than mine turned out if reccomend using less colored clay. I then rolled out the three colors together and cut off chunked with my blade to look like a real Quartz. In the pictires above I have a real Quartz to show the similarities. To get a more realistic texture you can mold a real Quartz in mold putty and just stuff your clay inside. I then out an eye screw in the top, removed it, baked it and screwed it back in. I then attached to a chain with clasps and voilà!
DIY Watermelon Highlighter
Ever since the rainbow highlighter I have seen DIY highlighters all over the Internet! Therefore I decided to try and make my own! This is my attempt on a watermelon highlighter!

What You need-
- Eyeshadow
- and empty compact
-rubbing alcohol
-something to mix in and with
I got my pallets from the dollar tree for a total of $2.50. Begin this process with the green. Scrap some green shadow into a container and add a little but of rubbing alcohol. Continue to add rubbing alchahol until it is almost a liquid but still thick. Spread this around the outside of your compact. Next repeat the process with your pink, only full the green ring. For the white I repeated the process and just dabbed it along the barrier of where the pink and green meet. I also added silver seeds. I know black would look realistic but I didn't want black smudges on my cheeks when I applied it! Next take a paper towel and press it against the shadow. Continue to do this until all the moisture is gone. Let dry. Now you have this super cute and unique Watermelon highlighter!
DIY Ice Cream Cone Pen | Mini Pen
This mini pen came with A LOT of trial and error. I redid this project many times. So I'll tell you the method that worked best. I began by taking some green oven ale lay but air dry might be easier. Begin by making the cone. Next take a ball of clay for your Icecream scoop. Flatten the bottom slightly and begun texturing it like you would a clay macaron. Next cut your pen to the length of the cone and deal with glue. Once dried carefully twist into the cone. Make the hole at the end a little bit bigger than you think it should be to cover the thicker end of the pen. Remove the pen and bake the two pieces seperatly. Lastly glue the Icecream scoop on the cone, insert your pen, and draw on the seeds
with sharpie or paint!
with sharpie or paint!
DIY Watermelon photo holders | Poloraid picture holder | Room Decor |
This watermelon photo holder DIY can be done many ways. You can mold the watermelon slice yourself or you can do what I did. I . . .
Began with a pink ball of clay. I made it a tad bit more elliptical by rolling it out a little. Then I took one white clay and covered the pink in an even layer. Lastly I marbled some light and green clay by twisting the two together and put a slightly thinker later around that one. I then froze it until firm. Then I cut it as if I was cutting a real watermelon. In half then in half again. You can slice this however you want your holder to look. Also the bigger you make it the better it will hold photos. Then I took some wire and wrapped it in a circle twice and secured it by wrapping the end around the bottom of the circle, I thin used the excess to make a 5 in "tail" I stuck the tail in the middle my watermelon slice, removed it then baked my clay. To get a better understanding of this process look at the photo of it in the slideshow above. Once the clay was baked to the instructions on the package you can insert your wire and begin!
Began with a pink ball of clay. I made it a tad bit more elliptical by rolling it out a little. Then I took one white clay and covered the pink in an even layer. Lastly I marbled some light and green clay by twisting the two together and put a slightly thinker later around that one. I then froze it until firm. Then I cut it as if I was cutting a real watermelon. In half then in half again. You can slice this however you want your holder to look. Also the bigger you make it the better it will hold photos. Then I took some wire and wrapped it in a circle twice and secured it by wrapping the end around the bottom of the circle, I thin used the excess to make a 5 in "tail" I stuck the tail in the middle my watermelon slice, removed it then baked my clay. To get a better understanding of this process look at the photo of it in the slideshow above. Once the clay was baked to the instructions on the package you can insert your wire and begin!
 RSS Feed
